Wouldn’t it be handy on occasion to achieve a narrow depth-of-field while shooting at f/16? The new Lightroom Lens Blur feature offers just that: fast-lens results from a slow-lens shot. So, is it a useful addition to the photographers’ compositional repertoire, or a fun but forgettable gimmick?
Algorithmic trickery
Adobe has introduced a further feature to the line-up of machine learning-enabled editing tools available in Lightroom. Last year we saw the introduction of a machine learning-enabled ‘AI-Denoise’ feature, which I discussed here. It does a superb job of eliminating noise from images generated when using high ISO to compensate for low light. In effect, it opens up creative photographic space beyond the exposure-triangle boundaries imposed by physics.
The new Lightroom Lens Blur feature aims to pull off a similar algorithmic conjuring trick.


Left: original, f/5.6. Right: after application of Lens Blur
In this case, the boundary being broken is the one imposed by the aperture, exposure and depth-of-field (DOF) triangle.
As novice photographers, we learned how aperture priority would drive the shutter speed/ISO combination required to achieve correct exposure. We also learned that adjusting aperture allows creative control over DoF; in particular, how wide open-apertures, yielding a shallow DoF, helps isolate the subject of interest from its background.
The pursuit of shallow DoF has driven the design of ‘fast lenses’. Lenses with maximum apertures below f/2.0 are generally held to be in this category, the most notable and expensive being the Leica Noctilux. At f/0.95, the 50mm Noctilux even breaks the f/1.0 barrier. It is the Roger Banister of photographic glass.


Left: original, f/8. Right: after application of Lens Blur
These lenses are prized for their spectacularly shallow DoF, both isolating their subject and delivering a dreamy bokeh. As such, they are popular with portrait photographers. However, they are tricky to use because focusing accurately becomes a challenge. This is why, although an M-Mount lens, photographers often mount the Noctilux on an SL2-body, employing its superb EVF and excellent focusing aids. Or, of course, they can attach the Visoflex EVF to the camera.
Wide open window might be closed
In some settings, though, shooting wide open is impractical. For example, when using zone focusing for street photography. Here, we need a zone of focus deep enough to discreetly capture a subject without necessarily using the viewfinder. Frequently, this requires setting an aperture of f/11, a focus point of several meters, and hoping for the best.
This approach typically works well, achieving a sharp image of the subject. A disadvantage is that the background is also in focus, cluttering up the photograph. Imagine being able to transform that image into one where a subject remains sharply focused but isolated from the background?


Left: f/9.5. Right: after application of Lens Blur
Another scenario which precludes use of wide-open apertures is bright illumination coupled with a maximum shutter speed of 1/4000s. Living in a sunny environment, I have encountered this situation numerous times with my Leica M240. My lovely 35mm f/1.4 lens has to be stopped way down to achieve correct exposure. The only optical solution is use of a neutral density filter
For both these scenarios — zone focusing and shutter speed limitations — a computational trick now offers a potential solution.
Lightroom Lens Blur
If you have used ‘portrait mode’ on an iPhone, you will be familiar with the approach. A machine learning-algorithm ‘segments’ the image, classifying its pixels into different categories. These might be subject, near-distance, middle-distance etc. The algorithm then selectively applies a blurring effect according to how the pixels have been classified. The result? A sharp subject, such as a human face, behind which is an attractive bokeh.
The Lightroom Lens Blur feature achieves a similar effect. The difference is, I can apply it retroactively and with much greater control.


Left: f/11. Right: after application of Lens Blur
Lightroom Lens Blur is available as an early release. I expect it will improve as its machine learning algorithm receives further training data, and users provide feedback. Nevertheless, I have been experimenting with it and exploring its strengths and limitations.
To illustrate its effect, I have included ‘before and after’ examples throughout the article. I have also included several ‘three-way’ comparisons. Here, I took shots of the same scene at f/2 and f/11+, and then applied Lens Blur to the image shot at f/11+. Did the computational blurring replicate the DoF of the f/2 image? Read on and find out.


Top: f/18. Lower left: f/2. Lower right: f/18 with application of Lens Blur. Note slight differences in perspective
Using Lightroom Lens Blur
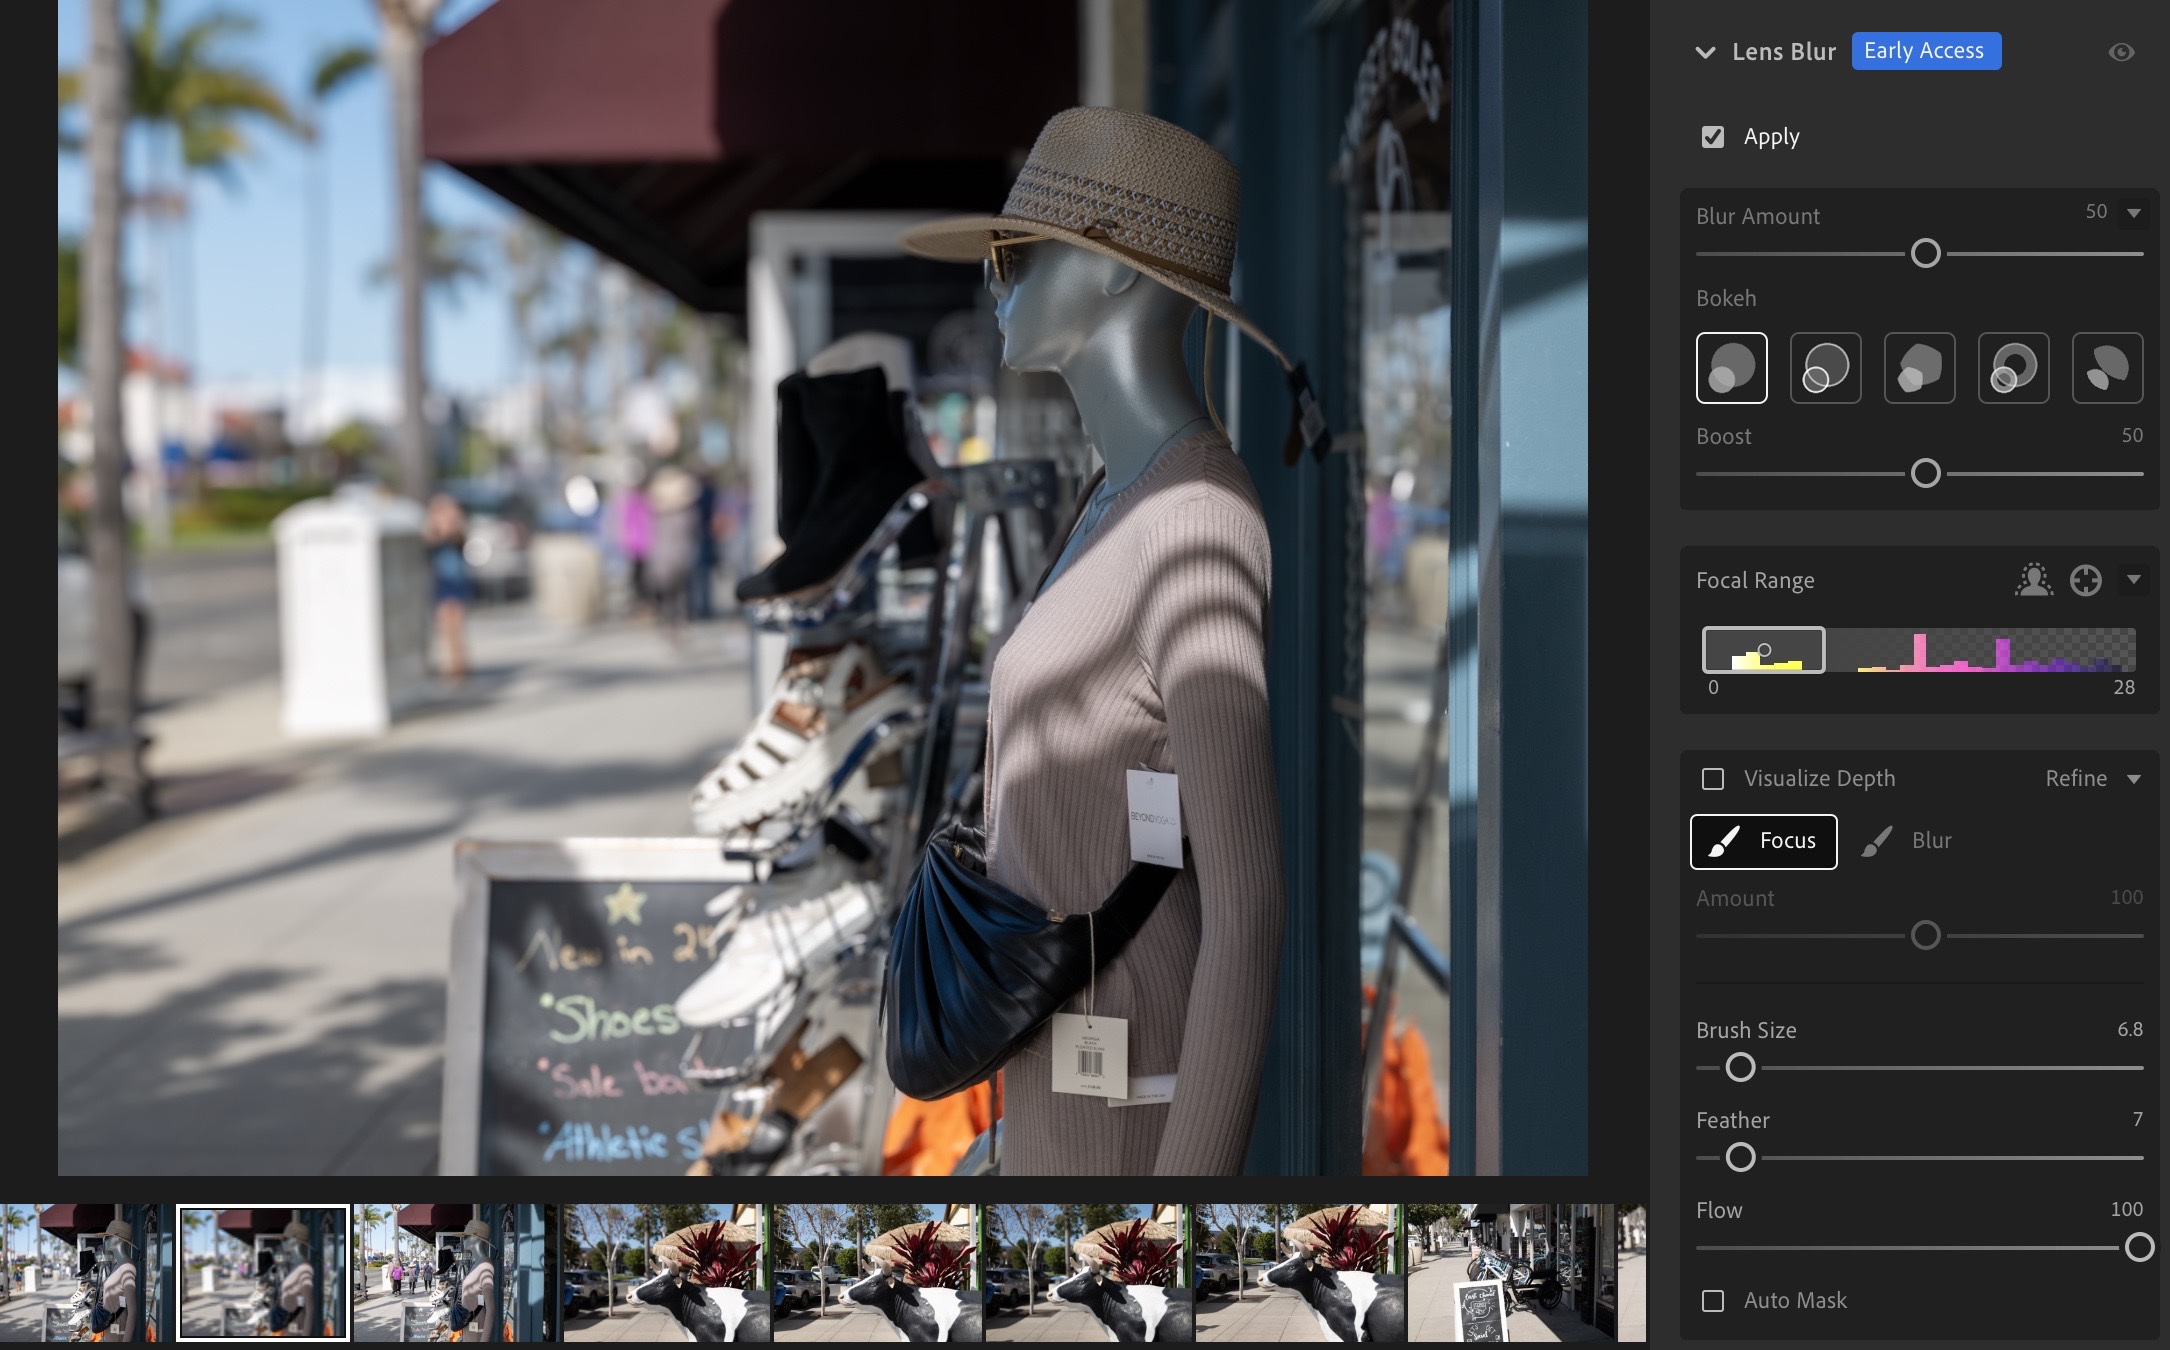
The Lightroom Lens Blur panel can be found in the editing menu, below the Denoise panel mentioned earlier. The screenshot below shows how the feature works.
When the ‘apply’ box is ticked, the system calculates and presents a blurred version of the image. It selects a default bokeh type and a 50%-blur level. Both can be adjusted; via a slider for blur-level and a set of options for bokeh. You can view a very helpful graphic illustrating the focal range. This can be moved, expanded, or reduced, to optimize the effect.
The system also provides an option to manually adjust which features are blurred/focused by painting in with a brush. The brush size and properties can also be adjusted.
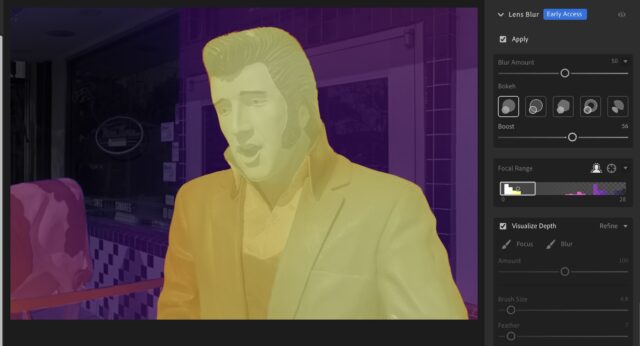
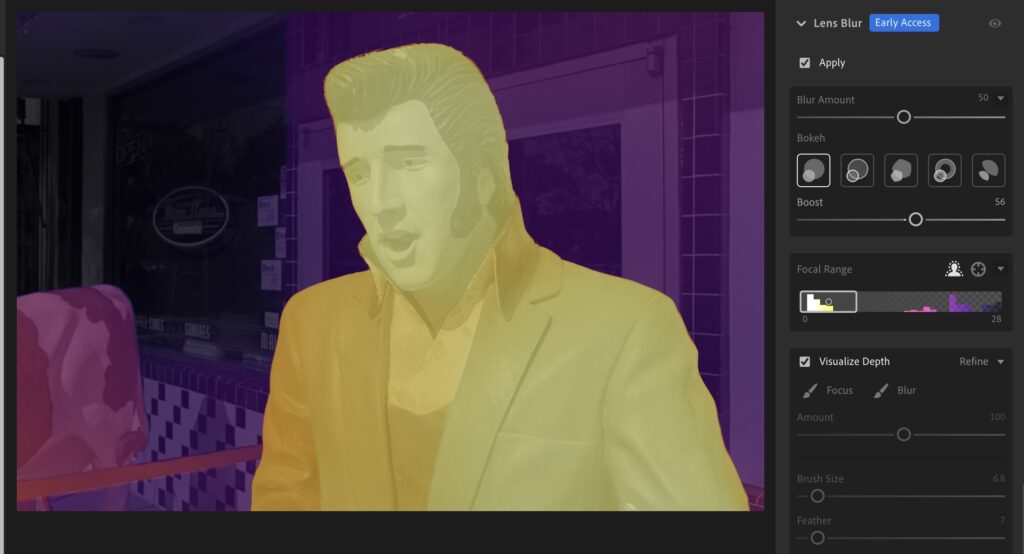
If a user clicks the Visualize Depth box, as illustrated below, a colour-coded-by-depth version of the image is presented. You can see how the algorithm has approached ‘segmentation’ of those pixels according to distance from the camera. This feature is extremely helpful for making minor adjustments to the blur effect. For example, if the algorithm blurs an object which should be in focus, this is easily corrected with the brush.
With a little practice, I found the system easy to use. As with most tools of this type, a light touch seemed to produce the best effects. I often dialled back the effect to 30% or less.
Marks out of ten for Lightroom Lens Blur
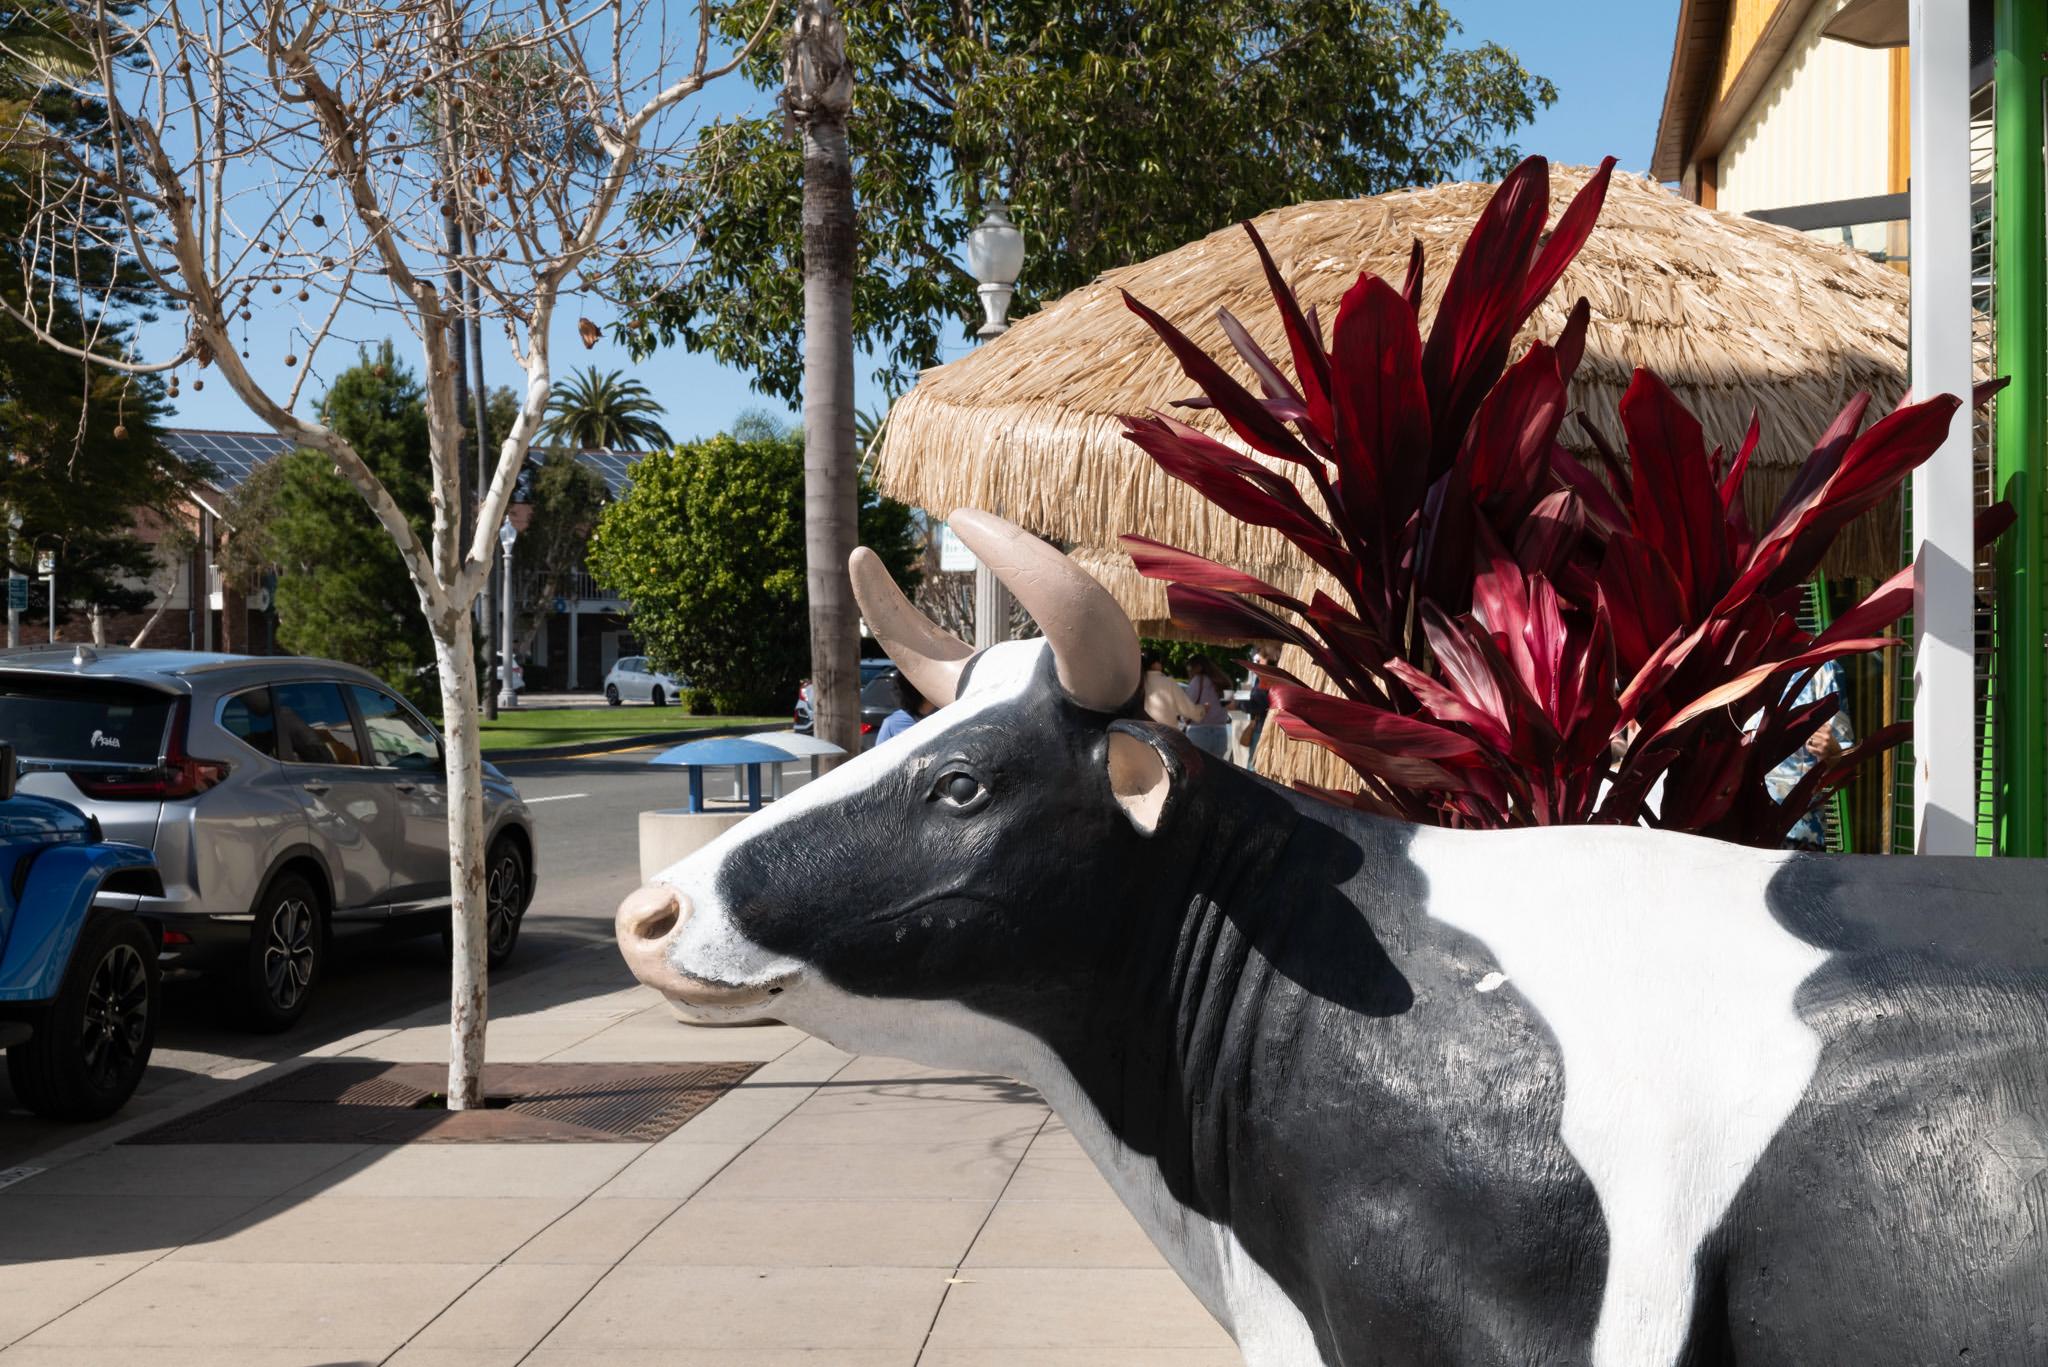
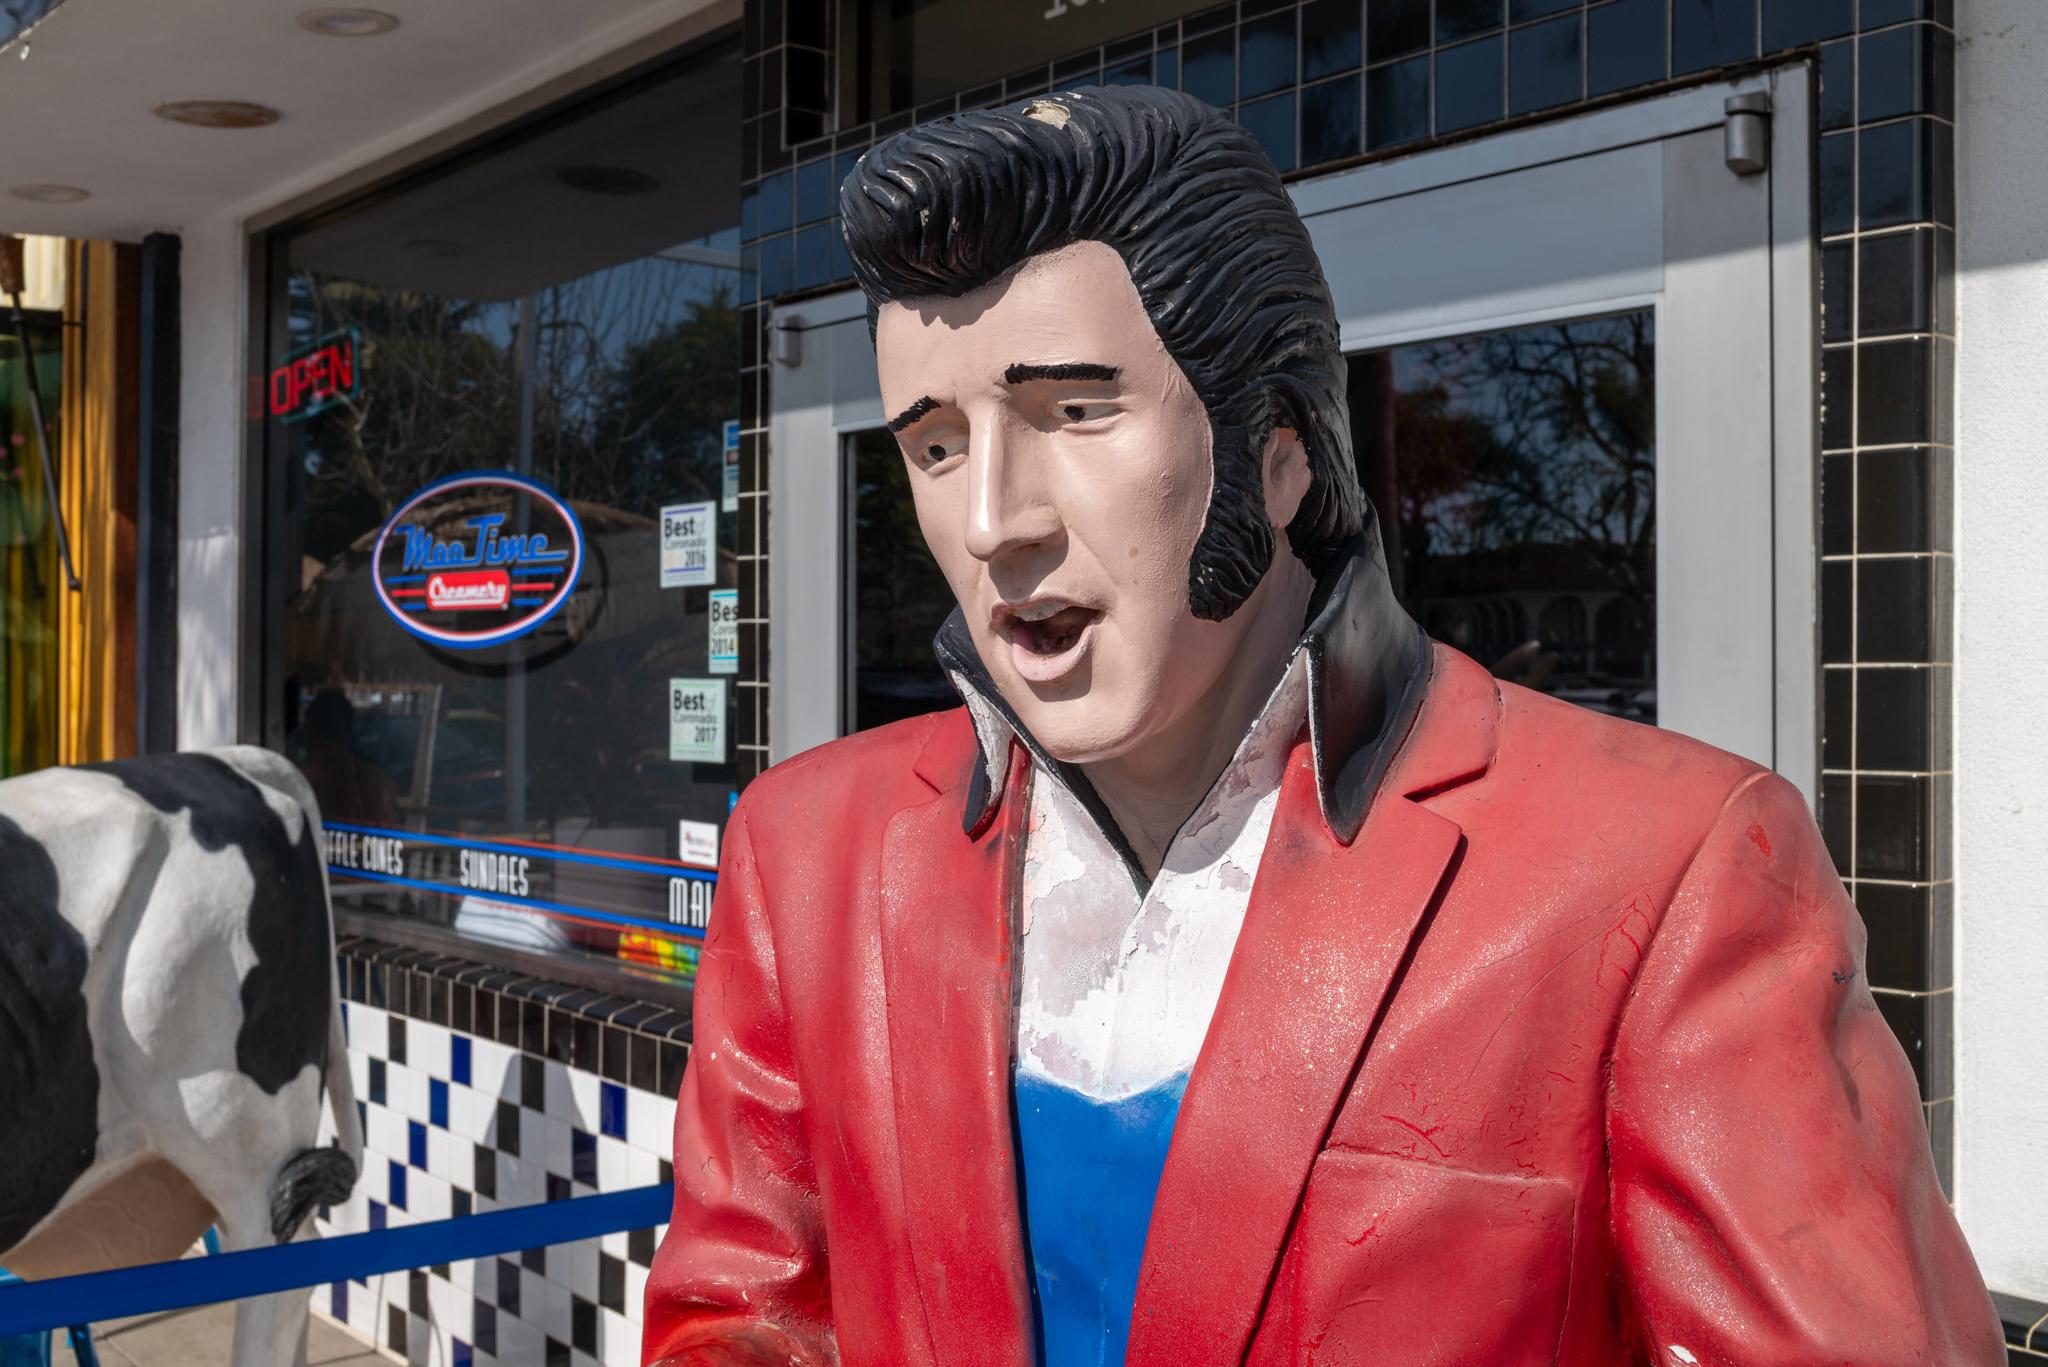
I had fun experimenting with it. The feature was most successful when the subject of the photograph was easily identified and square on to the camera. In most cases, this was a human form, but the system also handled images where the subject was a sign or a fibre-glass cow. In some cases, I needed to intervene manually, either blurring or unblurring a detail in the subject.


Top: f/11. Lower left and right: f/1.4 and f/11 with Lens Blur. Which is which? Note slight difference in perspective
Overall, as an early release of a new creative tool, I would rate Lightroom Lens Blur 7/10.
But, you might be asking yourself why anyone would go to the trouble of using this feature on their photograph?
I would be surprised if a professional photographer, for example, a portrait or wedding photographer, would use Lightroom Lens Blur. I assume they own fast lenses and would not tolerate any computationally-generated artefacts in their images. Perhaps someone creating an advertisement, or a poster for display on noticeboards, might find it of use. These do not carry the weight of personal images viewed for many years, or even across generations.
When I asked myself that question, it led me to consider a broader point. What is my objective in taking photographs, and how would applying this effect help me achieve that objective?
Useful tool or distracting gimmick?
I am not a professional photographer. I suppose I am an enthusiast. Or a hobbyist. My local community, who see my photographs on display occasionally, refer to me as a visual artist! How fancy!
So, my thought is that anyone who aspires to create art through photography would find this a useful additional creative tool. Isn’t it akin to deepening shadows, adjusting colour saturation, and removing unwanted noise? If it can help someone produce images that come closer to their creative vision, surely that’s a good thing.


Left: f/16. Right: with application of Lens Blur
To answer the question posed in the title of this article, I would vote for ‘useful tool’ rather than ‘distracting gimmick’.
If you have used Lightroom Lens Blur, I would be very interested to hear your perspective. Please don’t hesitate to comment below. And, I wonder what machine-learning-enabled image enhancements might be coming our way next?
Read more from the author
Want to contribute an article to Macfilos? It’s easy. Just click the “Write for Us” button. We’ll help with the writing and guide you through the process.



This technology has been available on phones for some years. My 2018 Huawei phone will show an effect described as f0.95 which is similar to those shown above. Keith some of the converted images shown above are OK, but, with respect, some of them are not so good, such as the barefoot woman in black and white. The original unconverted image looks much better to me. My iPhone 15 Pro will give a ‘bokeh effect’ in Portrait mode, but I don’t use it that much.
I will send you (and Mike and JP) some photos from a book on Telephotography by Cyril Frederick Lan-Davis, an early British pioneer in this field, working for Dallmeyer. Lan-Davis died at Gallipoli in 1915, but his book and his lenses continued to be updated formally years after his death. I have recently acquired not only the 1935 updated edition of his 1912 book, but also a 1934 Leica III with a Dallmeyer 12 inch (300mm) lens, for which he did the original optical design before he died. The book shows massive 1000mm f8 Dallmeyer lenses being used at sports events in the 1930s and one of photos in the book features a cricket photo taken with such a lens with as much ‘bokeh’ and separation as you could want. The smaller 35mm format, which some people call ‘full frame’ today, gave much less separation than earlier larger formats. We all know that a smaller format will give less separation and there are plenty of examples of 19th Century images with separation and bokeh due to the latter formats then in use.
What we are seeing today since the ‘digital turn’ is the gradual replacement of hardware with software. At Leica Society International our webinar on AI editing tools has had to be postponed tonight, due to unforeseen circumstances, but we will be holding it again at a near future date. We are also planning a Zoom webinar about the application of AI generally in photography. Leica is involved with Microsoft and others in a consortium which has led to it introducing a Content Credentials feature in a version of the M11. However, the game has only just commenced and there’s a lot more on the way.
William
William,
Fascinating info on the Dallmeyer lenses.
I liked your comment “The smaller 35mm format, which some people call ‘full frame’ today,” The fact that 24X36mm is called Full Frame is a testament to how far 35mm went during its run. I can remember when few pros would use 35mm for any commercial photography except photojournalism. Eventually 35mm became dominant, even for many snapshooters. Now in the digital world, not only is 24X36mm “full frame”, it is also how lenses are described as “equivalent focal length”, regardless of format.
Hi William, yes, as I mentioned in the article, iPhone users will already be familiar with this technology through ‘portrait mode’. I recall first using it back in 2019. It might even have been available even earlier than that. I remember seeing an amusing early Instagram post of a seagull on a wall, taken using portrait mode. The background was nicely blurred, apart from the area between the bird’s legs – the segmentation algorithm having been tricked into thinking it was part of the gull’s body.
I think the decision whether to use this feature, and if so, how much of it to use, is down to personal taste. In some cases it works well, in other cases not so much. Also, I suppose the idea with candid street photography is to include some background context – i.e., the surrounding street! In which case, blurring it completely can be counterproductive.
Good for you and the LSI for devoting some discussions to the place of AI within photography. If one includes object recognition as a focus aid, denoising, blur effect, and even automated generation of objects, there’s a lot to discuss. I was told once that the crucible of computational image enhancement is astronomy, where light is scarce, or spacecraft hurtle past celestial objects at incredible speed. Innovations then eventually make their way into terrestrial applications. Perhaps a conversation with an astronomer might reveal what the next image enhancement innovation will be. Cheers, Keith
I’ve experimented with it a few times, and you have to dial down the effect or it looks like the image is fake. I also found that it chewed up computer memory, albeit with a four year old iMac but with 32GB memory.
My preference is to still try to put my brain in gear and open the aperture on the lens before I shoot, rather than doing this in post.
Four years old should not be an issue. In case you hadn’t noticed, development of computer processors came up against a brick wall a few years back. I am out of school on this, but it has something to do with limits on the semiconductor density imposed by the wavelength of laser light or something like that. So that is why you see new processors adding more “cores” for faster throughput. There will of course be another breakthrough.
I am sure someone on here will correct what I just wrote.
Hi John, fully agree on the need for a light application of the effect. This is why having a simple slider to control the degree of blur is very helpful. I am considering entering some photos in a local competition and the rules prohibit significant post-processing modifications, apart from adjusting contrast and saturation. So, in this case, if you didn’t shoot the original image wide open, you are out of luck! Cheers, Keith
My short thought on this? My nightmares have all come true. (Partly joking here)
Thinking about it a little more, I see this as the continued democratization of photography, started way back by Kodak. It really no longer matters what you use to capture an image – the tech is there (or almost there) to let you shape it into anything you want to see. Film-like? Not a problem. You like that “Leica Glow”? Please see the Ricoh GRIII HDF! Light wasn’t quite right? Don’t worry – fixable. Which lighting would you like to see? Can’t afford a Nocti-mega-lux? No worries anymore…
It’s amazing, really. Interesting times…
Yes. And I think I’ll stick to the 11 year old body and 40+ year old lenses I have.
I hate to admit it, but I have barely used Lightroom so far.
Hi Hank, I see it pretty much the same way – yet another option for adjusting the image to achieve a desired aesthetic. Amazing indeed! Cheers, Keith
Hi Keith,
“..The pursuit of shallow DoF has driven the design of ‘fast lenses’..” but the design of fast lenses began way back in the film days, when film sensitivity was around 100 ISO (ASA), and then crept up to 400 ISO (Kodak Tri-X, for example) ..but people wanting to shoot in very low light really did need ‘fast’ (wide aperture) lenses for using ‘fast’-enough shutter speeds so as not to produce hand-held blur.
I’ve used ‘blurry-magic’ software to dissolve obtrusive backgrounds afterwards – programs such as Focalpoint and Movavi Photo Focus (of 2017) – if I haven’t had the chance to ‘open up’ the aperture before the exact moment of shooting.
It’s – to my mind, anyway – like using any other photo-editing software to (for example) enhance sharpness or contrast, or to correct bad colours, or to correct tilts or over-converging verticals, etc.
It’s no different – for me, anyway – than ‘dodging and burning’ when enlarging photos in the old days of film. “The negative’s the score, the print is the performance!” to (roughly) quote Ansel Adams.
Think of the Ernemann ‘Ernostar’ 100mm f2 (manufactured 100 years ago!) as used by Erich Saloman for his indoor ‘candid’ shots of post-1st-World-War politicians.
(I’m not sure if this link will work properly to show one of his photos..)
https://upload.wikimedia.org/wikipedia/commons/0/09/The_Hague_Reparation_Conference.png
It was really with the advent of a conversation about ‘bokeh’ (..the quality of out-of-focus areas in photos, as mentioned in Mike Johnston’s ‘The Online Photographer’..) that western photographers really started wanting nice, blurry backgrounds, but achievable with ‘standard’ – instead of long telephoto – lenses that the race towards blur and wide aperture lenses began, although Canon had made a few ‘bragging rights’ 50mm f0.9 and 50mm f1 and f1.2 lenses, particularly for the Canon 7 film rangefinder made back in 1961.
David, I had a look at this in my phone and couldn’t fix it. Is this a straightforward URL? I tried adding it as a link and it didn’t work. Can you send me the link by email and I will see if I can fix it?
Hi David, good point – the original motivation for designing fast lenses was indeed their light-gathering capability. That is still a valuable feature, for example shooting in very dim light, but with modern sensor-technology, the emphasis seems to have switched to quality of bokeh. In fact, you can easily find YouTube videos running detailed comparisons of bokeh effects between different ‘fast’ lenses. Cheers, Keith
Just shows, I’d written this off as a gimmick after seeing some hit and miss effords on my phone. Your demos are great and I will not definitely have a go myself. I like the sliding treatments so you can see both images side by side.
Andy
Hi Andy, that’s great. In putting the article together, I thought the slider comparison really brought home how well the effect worked. Glad you found it useful! All the best, Keith
Thanks for this overview. I’ve read about the feature before but didn’t get around to trying it, but your article has kindled my interest and I will definitely give it a go. I can see real opportunities for lens blur and your examples are very compelling. Thanks again
Hi Joy, glad you found the article useful. All the best with your lens-blurring journey! Perhaps you can revisit this comments thread with your own assessment of Lens Blur. Cheers, Keith
Hi Keith,
that’s a truly interesting article, which will divide the audience in two parties, Pro/Con.
I haven’t used this feature so far. I’m more the old fashioned guy, who fiddles with the aperture to achieve the wanted results. You mention the limitations of a fast lens and 1/4000s shutter time. Would I use a ND-filter? Probably not, I’d use the Q … or D850 to solve the problem.
Like Ed says, we should all go out and shoot thistles to make LR or us cry.
I’m a frequent LR-user for developing RAW-files. I’m using the same preset for Nikon, Leica Q and M and it works fine for me. Thirty seconds max for each image is my limit.
So my conclusion is to get the issue done when taking the images and not afterwards.
Cheers
Dirk
Hi Dirk, many thanks. I suspect there might be a correlation between how geeky/nerdy you are and how much time you are prepared to invest in learning and using these various post-processing tools. I think I probably have a higher nerd index than you (or just more time!) and so I really enjoy this post-processing stuff. All the best! Keith
I would be really interested in how Lightroom Lens Blur does with a subject like a close-up of thistles in the foreground. The iPhone Portrait Mode makes a hash out of this, because the individual spines of the thistles are too small and too densely-packed to reproduce accurately by their algorithm.
One would imagine that stand-alone technology, not coupled with something like an iPhone, would do better. And that things would continue to be improved dramatically as time passed. For me, it’s like the programs putting clouds in an empty sky. It usually works, but the masking fails if there is a complex ground / sky interface.
Once spring finally arrives here, I will try my test with some plant matter against a distant background. Still snow on the ground here, the day of the eclipse.
Ed
Hi Ed, I would be extremely interested to learn the result of your thistle study! It is well and truly Spring in Southern California. We do not have many thistles, but there are some very nice grasses at the beach that might serve the same purpose. I might even try it out myself. All the best, Keith
Very interesting article, Keith. But I would disagree about one point: I think professional photographers would use this feature a lot. They only own super fast lenses to deliver a certain desired effect. If there is a tool they can use post-shoot instead, or in addition, they will use it. No different than retouching to remove facial blemishes or enhancing a photo any other way.
As for me, this is yet another proof that I am a photographic dinosaur. Or maybe just a curmudgeon. Why did I fork over $ for my Noct-Nikkor 58mm f1.2 when I can now just buy Lightroom? Better yet, wait long enough, and I won’t need to take any photos ever again. Just download any in the public domain, and manipulate it as I want. Oh, that’s right, AI will soon obviate the need to do even that. Just speak my photographic ideas into existence!
Hi Martin, many thanks. I can understand the reluctance of many photographers to dive deeper and deeper into post-processing of images in this way. What I think we are seeing is the inevitable long-term consequences of the transition from film to digital photography. Having the image in digital form, i.e., a collection of pixels, opens up a world of opportunities for manipulation of those pixels in order to change the overall image in some way. The enormous advances we are seeing in machine learning algorithms is in large part because of the availability of digital images for training them. I suppose one can skip post-processing completely by just shooting in JPEG and leaving all the optimization to the camera’s processor. Or you can dive in deep and use every available option on your RAW files. The choice is yours! Cheers, Keith
“What I think we are seeing is the inevitable long-term consequences of the transition from film to digital photography.”
This is spot on. Many of these post processing tricks are analogous to the things we used to do in the darkroom, e.g. dodging and burning (B&W) or filtration (color). I did those, too. But at some point after saying goodbye to my last darkroom (that was 1986!), I settled in to doing my best in-camera to produce the transparencies I sought with my mind’s eye, so to speak.
I see JPEGs produced in-camera as analogous to transparencies, and RAW files analogous to negatives. I am sure I am not the first to say this.
OK, I will have to eat (some of) my words, I have just been compiling the annual Mother’s Day photo album that I have done for 41 years (the age of my oldest minus one). Each MD I gift my wife with a photo album containing photos of family activities during the year since the last Mother’s Day. Nowadays the album includes photos taken by me, plus any others I can obtain from children or extended family members.
This year many of the photos came from a family reunion in Montana last July, including many taken by others. Because of lighting conditions and busy surroundings, this year many of the photos had to be edited to adjust exposure and cropping. I was using the built-in Windows photo editor for this, and noticed it has a background tool. I tried background blur a few times, and discovered it was very easy to use, and did improve the visual impact of many photos! Goes to show you can teach an old dog new tricks.
Thanks for the update, Martin, and congratulations on your wonderful family tradition. I am not familiar with the Microsoft ‘Lens Blur’ tool, since I am a Mac user. I would be interested to understand how it resembles/differs from the Lightroom tool.
BTW, learning new tricks is excellent for brain health, as I described in this Macfilos article last year. All the best, Keith
https://www.macfilos.com/2023/01/13/ten-ways-photography-is-good-for-your-brain/
Thanks, Keith. I remember that brain article, and will read it again with more interest.
When one opens a photo in the Photo Editor, at first there are icons above the image that allow you to Print, Delete, and Edit, among others. Click on the Edit icon, and this reveals more icons above the image. including Crop, Adjust, and Background, among others. Open Background, and give it a few seconds and AI (I suppose) creates a mask. There is a mask tool that allows one to alter the mask, either to mask additional areas or unmask some. You can change the size of the mask “brush”. Once satisfied, then one can select Blur, Remove, or Replace. Blur has an intensity slider.
I found the if the main subject is people, the AI mask tool works great most of the time. Sometimes I had to make small adjustments, such as one arm of the chair someone is sitting in is masked, the other, not.